
How to Connect PrintSage to Shopify: Step-by-Step Setup Guide
If you sell on Shopify and want to add custom, print-on-demand products to your store without holding inventory, PrintSage is built to plug in directly. The connection itself takes about two minutes once you know where to click. This guide walks through the full setup, from logging in to verifying the connection, plus the fixes for the handful of things that can go wrong along the way.
This is also a good moment to zoom out: Shopify print-on-demand searches have been climbing steadily as more sellers look for US-based alternatives to the large offshore-routed POD networks, and marketplaces themselves are raising the bar on delivery speed. Amazon, for example, just tightened its Seller Fulfilled Prime delivery-speed requirements effective July 6, 2026, pushing sellers toward faster, more localized fulfillment. The same pressure is showing up on Shopify: buyers expect quick turnaround regardless of which platform they’re ordering from, which is exactly why a US-warehouse POD setup like PrintSage matters.
Before You Start
A few things to have ready before you begin:
- An active PrintSage account (sign up at print.shipsage.com if you don’t have one yet)
- Admin access to the Shopify store you want to connect
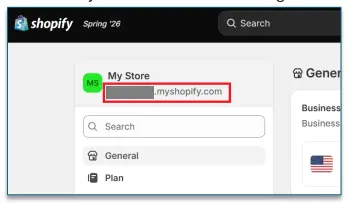
- Your Shopify store URL in the format your-store.myshopify.com — found under Shopify Settings → General
- Pop-up blockers disabled for the authorization step
Step 1: Log In to PrintSage
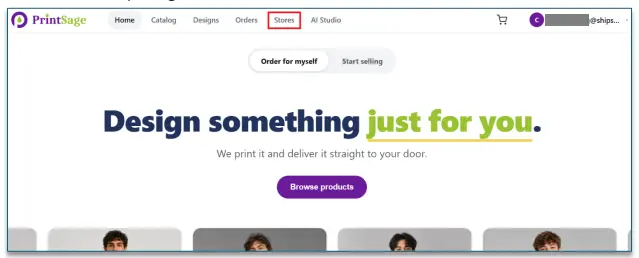
- Sign in to your PrintSage account.
- From the top navigation menu, click Stores.
Step 2: Add a New Store
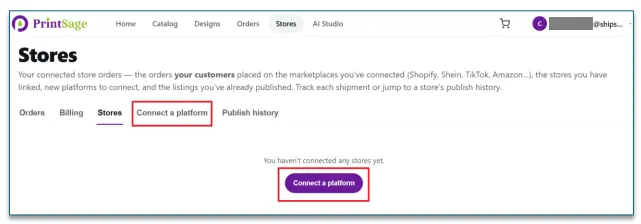
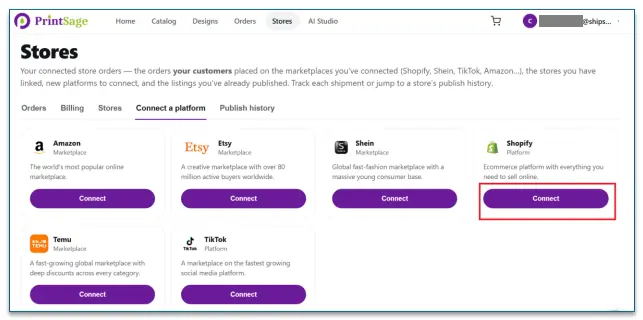
- On the Stores page, click Connect a platform.
- A list of available marketplaces and ecommerce platforms will appear, including Shopify, Amazon, Etsy, TikTok, Shein, and Temu.
Step 3: Select Shopify
- Locate the Shopify option in the platform list.
- Click Connect.
Step 4: Enter Your Shopify Store URL
- A Connect Shopify window will open.
- Enter your Shopify store URL in the format your-store.myshopify.com (for example, mybrand.myshopify.com). You can find this under Shopify Settings → General.
- Click Authorize.
This is the step most first-time users pause on — Shopify will ask you to confirm that PrintSage can access your store’s product and order data. This is standard for any fulfillment app and mirrors how Printful, Printify, and other POD integrations request the same permissions.
Step 5: Wait for Authorization
PrintSage automatically verifies the connection. This usually takes only a few seconds — there’s nothing else to click during this step.
Step 6: Verify the Connection
Once authorization is complete:
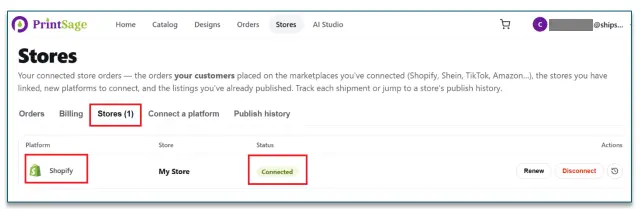
- Your Shopify store will appear on the Stores page
- The connection status should display as Connected
From here, you’re ready to start publishing products from the PrintSage catalog directly to your storefront.
ShipSage Print on Demand Service →
Troubleshooting: Unable to Connect?
If the connection doesn’t go through on the first try, check these first:
- Make sure you entered the correct .myshopify.com URL — not your custom domain
- Confirm you’re logged in as the Shopify store owner or have permission to install apps
- Disable any browser pop-up blockers if the authorization page doesn’t open
- Refresh the Stores page after installation if the status doesn’t update immediately
If none of that resolves it, the PrintSage Support team can help directly.
What to Do After You Connect
Once your store shows as Connected, the next steps are:
- Browse the PrintSage catalog and choose your blank products
- Upload your designs and preview them across color variants
- Set your retail price and check your margin before publishing
- Publish products directly to your Shopify store
- Every order placed on your store routes automatically to PrintSage fulfillment — no manual steps required
There’s no separate approval process and no waiting period. Products can go live as soon as you publish them.
Frequently Asked Questions
Do I need a paid PrintSage plan to connect Shopify?
No. Connecting your Shopify store to PrintSage is free. You only pay the base product cost per order once it’s fulfilled — there’s no monthly fee to link your store.
Can I connect more than one Shopify store to PrintSage?
Yes. Repeat the same steps from the Stores page for each additional store you want to connect.
What happens to products I’ve already published if I disconnect?
Disconnecting a store pauses order syncing, but published listings remain on your storefront until you remove them manually. Reconnecting restores the sync.
Does connecting PrintSage affect my existing Shopify apps?
No. PrintSage only requests access to product and order data needed for fulfillment — it doesn’t interfere with other apps running on your store.
How long does the whole setup take?
For most sellers, the entire process — from logging in to seeing Connected status — takes under five minutes.
The Bottom Line
Connecting PrintSage to Shopify is a six-step process that takes a few minutes and doesn’t require any technical setup. Once it’s connected, product publishing and order fulfillment run automatically in the background, so the real work shifts to designing products and growing your store instead of managing logistics.
Ready to Connect Your Store?
Log in to PrintSage, click Stores, and connect Shopify in under five minutes. No setup fees, no monthly subscription.
Visit PrintSage.com | Install the Shopify App | Contact Support
Fill out the form below to start a conversation with our team. →